Etch Your Own Circuit Board
By Bill Johnson KI4ZMVDoes this look familiar? This was an earlier project. It consists of a +/- 5-volt power supply driving an op-amp, which in turn turns on and off a clock, whenever the attached HT senses a signal on our repeater. Nightmare wiring jobs like this make you wonder if there might be a better way. There is. Etch your own circuit board.

Figure 1. This is hardly a model of neatness. A custom circuit board would have made this both neater and more reliable.
If the complexity of etching your own frightens you, have heart. It is not as difficult as you might think. You may be pleasantly surprised to learn that the necessary software is available free, and that the etching chemicals can be found at any Wal-Mart. Just follow these simple nine steps.
Step 1. Prototype The Circuit
Before we get to the chemistry, you will first need a working circuit. This in turn has to be turned into a piece of artwork, which will later be transferred onto a copper clad board. Figure 2 is a sketch of my prototype. This circuit converts RS232 to TTL using a Max232 chip. The board also contains a 5-volt voltage regulator. I built a breadboard version to verify that the circuit performed as expected from the sketch below.
Figure 2. This is the circuit from which the prototype breadboard was wired, with the exception of the regulator that was added later. Figures 17 and 18 below show the transition from breadboard to circuit board.
Step 2. Create The Artwork
Guided by the circuit sketch, in figure 2, the next step is to create the artwork needed to etch your board.
There are many options for turning your circuit into artwork, but the one I prefer is the software provided by Express PCB. You will find their free software at: http://www.expresspcb.com/expresspcb/. After you’ve made a few boards yourself, you may want to have the pros make your next one. That’s up to you. The good news is that what you learn using their software will help you either way.
I will not go into using the software. The site above has excellent tutorials for that. I will assume you can get to the print stage. Figure 3 is an example of the printed output.
Here is something to keep in mind. For this procedure, you will lay your board out as if the traces were on the top, even though when you are finished, they will end up on the bottom side of the board, with your components on top. In the transfer process, the image will be reversed if viewed from the rear, but correct if viewed through the board, from the top.
Step 3. Print The Artwork
To transfer your artwork to a copper clad board you will need to first print it using a laser printer, the kind that uses toner. Inkjet will not work! Set your printer for high quality, heavy lay down.
The paper you use is critical. You want a paper that has a clay coating. You can find this in any stationary store. It has a glossy, magazine page look. I got excellent results with HP Presentation Paper 120g. A 250-sheet pack will last you a lifetime.
Of course, you will need some copper clad board. You can purchase new, or look for a supplier that sells scraps.
Step 4. Prepare The Board
The surface of the board must be cleaned. Any grease on the board will interfere the etching process, and possibly prevent a good transfer from your paper image to the surface of the copper. I have used S.O.S Pads, and sometimes cleanser and a sponge. The important thing is to end up with clean, shinn copper. The two boards in the back are finished. The one in the front is being cleaned.

Step 5. Transfer The Image
The clean dry board is placed on a flat work surface. I use a piece of scrap plywood to protect the kitchen counters. It is a good idea to use some double-sided tape on the back of the board to keep it from moving around during the transfer process.With the board in place you are ready to transfer your printed image. Carefully lay the printed circuit image face down on the copper side of the board, and then tape it to your work surface. You don’t want it to move while you are applying heat and pressure.

The laser image consists of a heat sensitive resin. Our goal here is to re-melt this resin, and transfer it to the copper foil. Set the iron on high heat, and apply pressure. You will also want to move the iron around. Be careful not to move the paper. If you are concerned about the iron sticking you can place a sheet of standard copier paper over the one containing the image.
Step 6. Removing The Paper
Warning, the board will be hot after the transfer. Let it cool to the touch before you place it into a dish of warm tap water. Once in there, let it soak for a minute or so, gently rocking the dish back and forth.After a time, the paper will become wet, and at that point you can gently peel it from the board. It will not all come off at once. Be patient.


At this stage you will have to gently scrub with your fingers to remove the last of the paper fibers. Don’t worry about damaging the transferred image. If everything went well up to this point, the toner has become one with the copper board.

Step 7. Etch The Board
We are ready to etch away all the unprotected copper. You will need a mixture of two chemicals for this. Both can be found at Wal-Mart. The first chemical is hydrogen peroxide, the second is Muriatic acid. Hydrogen peroxide can be found in the drug department. You will find Muriatic in the paint department. It is used for cleaning bricks. It is also used to adjust the ph of swimming pools.A word of caution! Muriatic acid can be dangerous if mishandled. Follow these simple precautions. Always add water, or in this case peroxide, to acid, never the other way round. And most important of all, wear some kind of eye protection. I also like to be near a source of running water just in case. I know all this may sound a bit scary, but if you use some common sense and are careful, you will be fine.

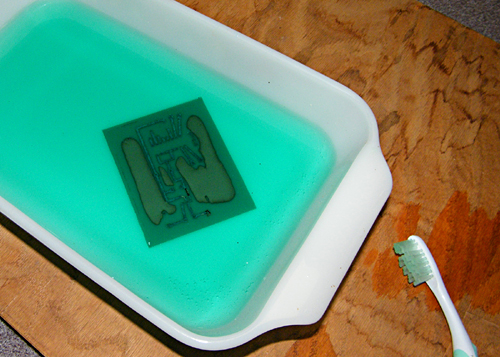
The ratio of peroxide to acid is 2 to 1. For my board I measured out 4 ounces of acid, to which I added 8 ounces of peroxide making a total of 12 ounces. This was transferred to the glass baking-dish. Next I slid the board into the solution face up.

Shortly after immersion, you will notice a dark discoloration form on the surface of the board. The chemicals are doing their job, but you have to help by gently rocking the tray back and forth. Alternately you can move the board around with an old toothbrush. Gently scrubbing the surface with the brush also helps. Be patient. The etching process takes about 30 minutes at room temperature. Rocking and scrubbing brings fresh chemical in contact with the copper, and at the same time moves the exhausted chemical out of the way.
Eventually all the copper will be eaten away leaving only the circuit traces.
Step 8. Clean Resin From The Board
After all the exposed copper has been etched away, you will have to remove the toner from the board. This is done with some steel wool, or an SOS soap pad. You will be amazed at how well the resin stuck to your copper board at this stage. A good deal of scrubbing is required to remove it.
Figure 14 is what you are aiming for at this stage. All the unprotected copper has been removed, along with the resist. The foil is bright, shiny and ready for drilling.

Step 9. Drilling
We are going to need some very small drills for this step. I bought a couple sets of these at Harbor Freight. They were inexpensive, and work quite well. You do have to be careful not to snap them. They are quite small. We will be using one with a diameter of 0.025 inches.
I’ve been told that you can do this by hand, but I think a drill press is the way to go, along with a lot of light and a set of powerful magnifiers.

Figure 17 shows is the finished board etched, drilled, and ready for components. You are viewing the traces through the translucent board lit from behind. The sixteen-pin socket dropped in nicely. The 0.025 holes gave just enough wiggle room to accommodate the 0.020 pins.
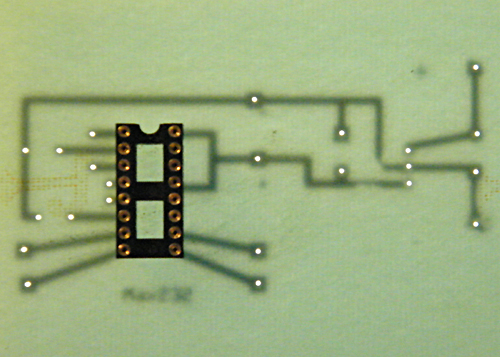
Here is the comparison of the finished circuit next to the breadboard version.


So here is a summary of the entire process:
1. Prototype the circuit
2. Create the artwork
3. Print the artwork on a laser printer using clay stock paper
4. Clean a copper clad board cut to size
5. Transfer the artwork to the board by applying heat
6. Remove the paper backing
7. Etch the unprotected Copper
8. Drill the holes
9. Populate the board
Not every project justifies your making a circuit board. They are a lot of work for something that will be used once or twice, and then placed on a shelf to collect dust. However, if your project will get some use, and more importantly, some day to day abuse, the circuit board is the way to go. The decision is yours. You now have the tools to fabricate your own circuit boards.
No comments:
Post a Comment